
USB Cradle Uninstall And Re-Install For Windows XP and Windows 2000
Note: Before you begin do NOT disconnect the cradle cables.Remove USB Cradle Drivers
- On your computer click the 'Start' button at the lower left.
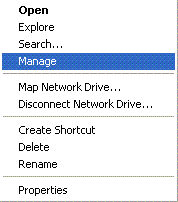
- On the Start menu that pops up find 'My Computer' and right click it.
If you don't see My Computer on the start menu look on your computer desktop for right click it to get a menu, then click 'Manage' on the menu.
- Highlight
 so that it looks the window looks like this
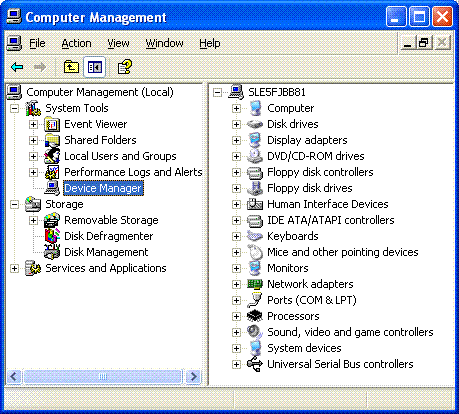
- Click the + to the right or 'Ports', locate "CP210x USB to UART Bridge Controller" and right click it.
- Select
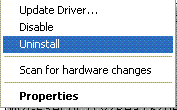
then click
- Click the + to the right or 'Universal Serial Bus Controller', locate "DisplayKEY USB Cradle" and right click it.
- Select
then click
- Disconnect both cables from the back of the cradle and disconnect the USB cable from the computer.
Please leave them disconnected at this time.
Close the GE Icon
- On your computer monitor down on the right by the time, locate the GE Icon

- Click the GE Icon with the right mouse button then click 'Exit' on the pop-up menu.
Uninstall USB Cradle Software
- Click 'Start' then click Control Panel
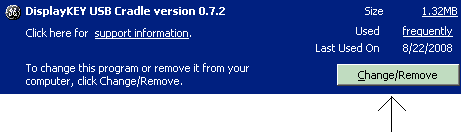
- In the Control Panel screen click to open 'Add Remove Programs'
- Locate and click

then click the 'Change Remove' button
- Click 'Yes' or 'OK' to any windows asking if you want to uninstall programs, then click 'Yes' or 'OK" to reboot your computer.
Download and Install USB Cradle Software
- Click this link to start the download
-
It's best to select "save" from the box, and save the application to your desktop

- Download and Install USB Cradle Software
- If your Personal Firewall Software interferes with DisplayKEY software installation disable or close it during the installation.
- Go to DisplayKEY Internet Security for a list of DisplayKEY programs to add to your personal firewall software.
- On the left side of the KIM Web screen, click

- Click
 ,
then click
,
then click
 and save the file to the desktop.
- When the download is complete, click
 , then follow the on-screen installation prompts.
- When directed to attach the cradle's USB cable to the computer make sure to connect the USB cable to the back of your desktop computer or directly into your Laptop, for the strongest signal
- After the cradle is plugged into the computer, the 'Found New Hardware' window may appear. If you get 3 options to choose from select 'No, not this time' then click Next. Select install 'Automatically 'Recommended' then click Next.
- If you get a Windows Logo warning click 'Continue Anyway', then Click 'Finish'
- Follow the remaining installation steps on the screen to complete installation and update your DisplayKEY
If a second 'Found New Hardware' window appears, repeat the steps above.
Email Technical Support